Using API Gateway as DynamoDB Proxy
整理如何使用 Amazon API Gateway 當作 Proxy 直接存取 DynamoDB,而不需要透過 Lambda。
- 想法緣由
- 準備工作
- Rest API:寫入一筆資料
- Rest API:取得一筆資料
- 測試
1. 想法緣由
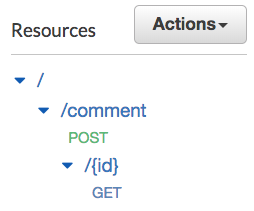
一開始我要規劃一對 APIs 對 DynamoDB 存取資料,規劃如下:
POST /comment: 寫入一筆 Comment 到 DynamoDBGET /comment/{id}: 從 DynamoDB 取得一筆 Comment- 在 Amazon API Gateway 建立 Rest API 如下圖:
大部分的設計直覺就是用 Lambda 實作存取 DynamoDB,然後 API Gateway Call Lambda,如下圖:
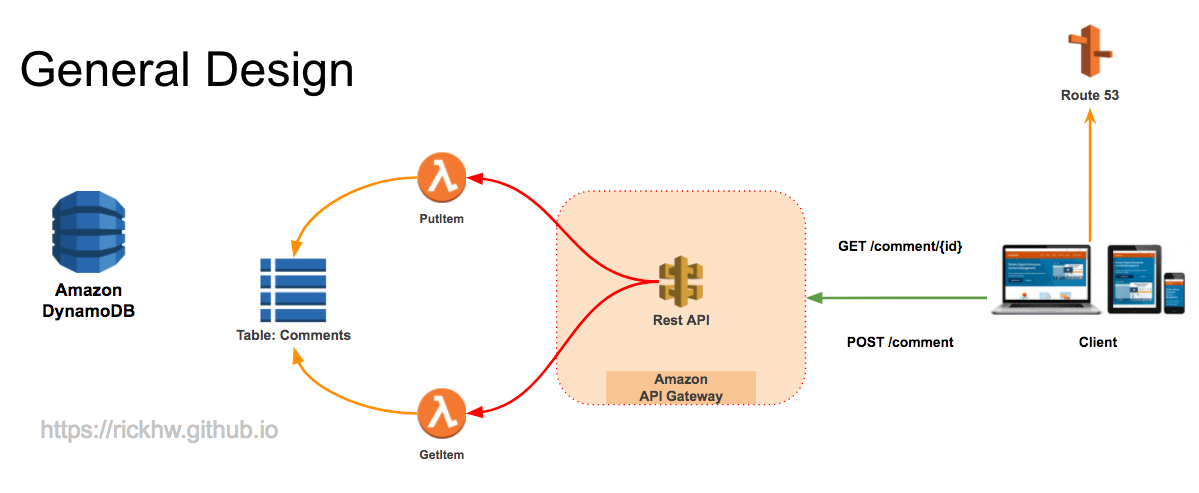
但是我在實驗 Developer Guide 範例 Create an API as an Amazon S3 Proxy 時想到,AWS 所有的 Services (EC2, DynamoDB, S3 …) 其實他們都有 API,AWS CLI or SDK 實作了認證機制: Signature Version 4 Signing Process ,讓開發人員直接 Invoke Services API。所以我就嘗試直接 Call DynamoDB API: PutItem、GetItem,實驗後發現可行。後來 google 到原來 AWS Blog 也有類似的介紹:Using Amazon API Gateway as a proxy for DynamoDB
下圖是最後實踐出來的樣子,中間沒有 Lambda 了:

2. 準備工作
- 建立 DynamoDB Table
- 建立 IAM Role 作為 API Gateway 存取 DynamoDB
2-1. 建立 DynamoDB Table
在 DynamoDB 建立一個 Comments 的 Table,可以執行以下 CLI:
1 | aws dynamodb create-table \ |
註一:測試時 Read / Write Capacity 給 1 就好,用完記得刪。
註二:這裡方便測試,只有建立 Partition Key,沒有 Sort Key.
2-2. 配置權限 IAM Role
建立 IAM Role:
- 允許寫入 DynamoDB
- 確認 Trust Relationship 有 API Gateway
- 複製 IAM Role ARN,大概會長這樣:
arn:aws:iam::123456789:role/Mixo-Dominant-Proxy-Role
1 | { |
3. 寫入一筆資料 (Put an Item)
- 建立 Resource:
/comment - 新增 Method:
POST
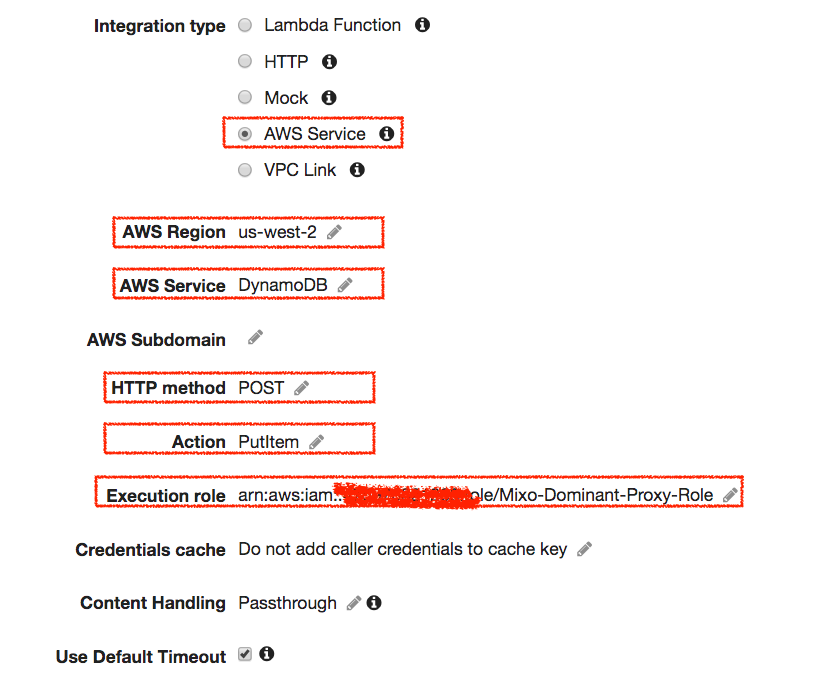
3-1. Integration Request
在 Integration Request 部分,指定以下設定:
- Integration type:
AWS Service - AWS Region:
你的 Region - AWS Service:
DynamoDB - HTTP method:
POST - Action:
PutItem - Execution role: 2-2 建立的 IAM Role ARN, 他應該長這樣
arn:aws:iam::123456789:role/Mixo-Dominant-Proxy-Role - 其他保持預設值
- 配置如下圖:
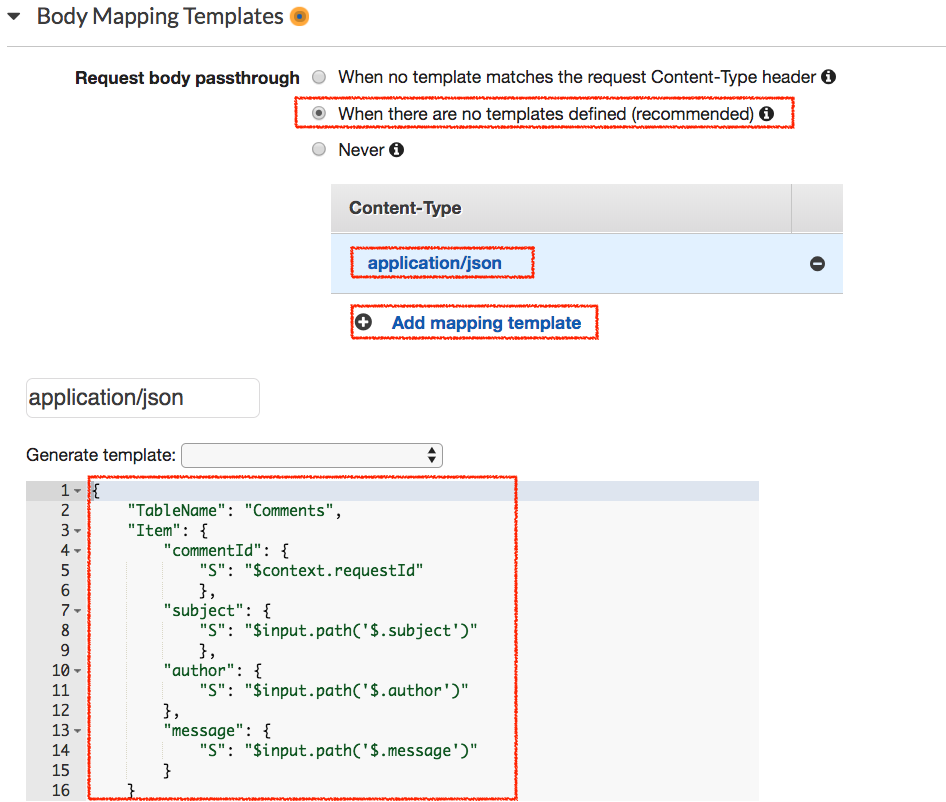
同樣在 Integration Request 設定畫面的下方 Body Mapping Templates 設定如下:
- Request body passthrough 選擇 recommanded
- 點選
Add mapping template,增加application/json - 點選剛剛增加的
application/json後,底下的 template 放入以下 JSON,這是給 DynamoDB 的 payload
1 | { |
操作設定如下圖:
3-2. Integration Response
- 回到 Rest API, 點選右下角的
Integration Response - 展開
Method response status為200的選項,操作設定如下圖:
- 展開
Body Mapping Templates-> 點選Add mapping template-> 新增application/json-> 設定 Template 如下:
1 | #set($inputRoot = $input.path('$')) |
操作設定如下圖: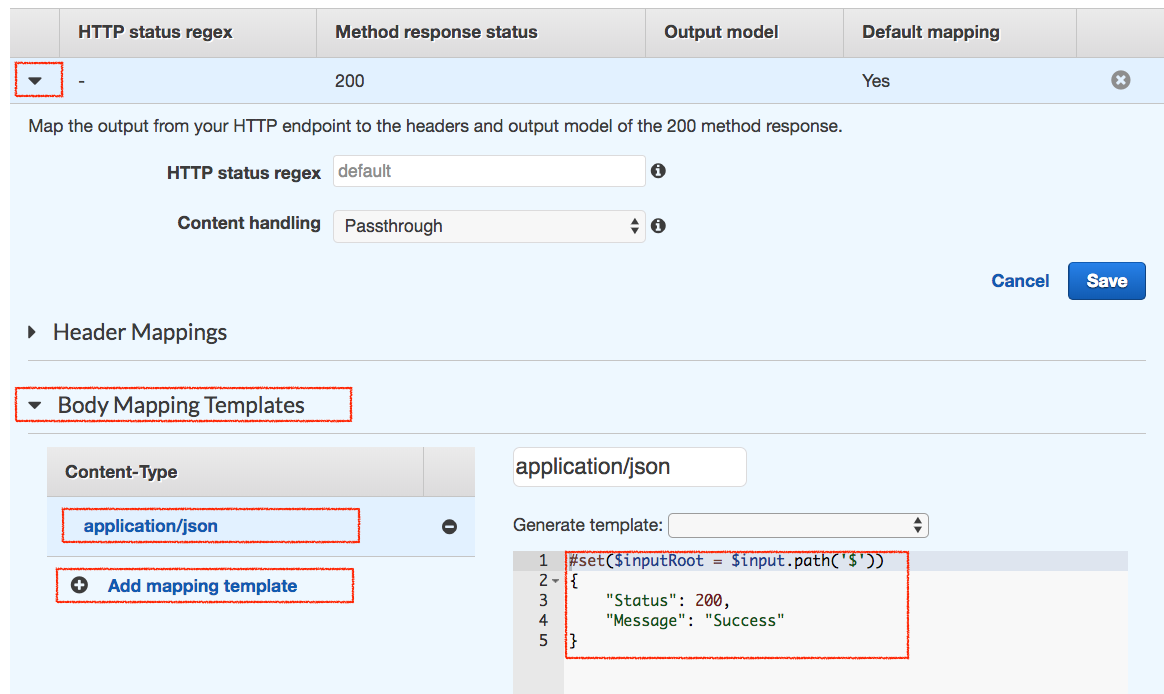
3-3. Test before deployment
在 Rest API 畫面,點選 Test,Request Body 填入以下:
1 | { |
順利的話,Response Body 會回覆 在 Integration Response 設定的 Template,如下:
1 | { |
到 DynamoDB 確認是否有資料新增。
4. 取得一筆資料 (Get an Item)
- 建立 ResourceName:
/comment/{id} - 新增 Method:
GET
4-1. Integration Request`
基本步驟同 3-1 描述,注意以下設定:
- AWS Service:
DynamoDB - Action:
GetItem - Body Mapping Template 如下:
1 | { |
4-2. Integration Response
步驟同 3-1 描述,Body Mapping Template 如下,重新 Format DynamoDB 回傳結果:
1 | #set($inputRoot = $input.path('$')) |
Body Mapping Template 使用 Apache Velocity Template Language (VTL) 做資料轉換
4-3. Test before deployment
在 {id} 填入 test-invoke-request,執行應該會取得以下結果:
1 | { |
5. 測試
依照 Custom Domain Names 的設定後就可以測試了,底下是 Curl 的測試:
1 | API_HOST=https://api.abc.com |
結論
本文整理如何透過 API Gateway 直接串接 AWS Service,變成類似 Proxy 角色的應用,過程當中省略了原本透過 Lambda 的用法,架構上更精簡。
要注意的是,因為這樣等於間接讓 DynamoDB 暴露出去,所以驗證就很重要,建議要配合 Custom Authorizers 還有 API Key 方式搭配。
延伸閱讀
系列文章
- Study Notes - Overview API Gateway
- Study Notes - Amazon API Gateway
- API Gateway - Custom Authorizers using Lambda
- API Gateway - Setup Logging
- API Gateway - Custom Domain Names
- API Gateway - Integrate with Internal Services
- Using API Gateway as DynamoDB Proxy
- API Gateway - Rate Limit and Throttling
- API Gateway Private Endpoint
- Design Async Invocation using API Gateway and SQS
- 2018/06/28: AWS Summit - 邁向 API 經濟 - API Gateway 導入之旅
站內延伸
參考資料
- Amazon API Gateway
- Using Amazon API Gateway as a proxy for DynamoDB
- Apache Velocity Template Language (VTL)
- JSONPath - XPath for JSON
Comments
About
著作
演講
- 演講錄影 @ Youtube
- 探索職涯、複利人生 - AWS Career Exploration Day 2023
- 個人著作 SRE 書友見面會
- 軟體測試實務 - 新書發表會
- 探索職涯、成就未來 - AWS Career Exploration Day 2022
- 從理想、到現實的距離,開啟品味軟體測試之路
- 91APP 在 AWS 上的 SRE 實踐之路
- 在矩陣型組織裡,如何有效管理 AWS 的成本結構與系統架構
- 災難演練 @ AWS 實戰分享
- 導讀持續交付 2.0 - 談當代軟體交付之虛實融合
- 聊聊軟體交付的濫觴 談產出物管理
- 從緊急事件 談 SRE 應變能力的培養
- 邁向 API 經濟 - API Gateway 導入之旅
- Monitoring Tools 大亂鬥 - AWS CloudWatch
- Ops as Code using Serverless
- 淺談系統監控與 CloudWatch 的應用
AWS Certifications