API Gateway - Custom Authorizer using Lambda
在 Overview API Gateway 中提到,Amazon API Gateway 提供了客製化驗證的機制,讓我們可以個別設定驗證的方式,使用者認證 (Authentication) 可以使用 OAuth or SAML;授權 (Authorization) 可以使用 JSON Web Token (JWT) 或者 OAuth provider。
本文整理如何使用 Lambda 做 Custom Authorizers 的基本用法與流程。
Custom Authorizers
下圖是 官方文件 描述客製驗證流程:
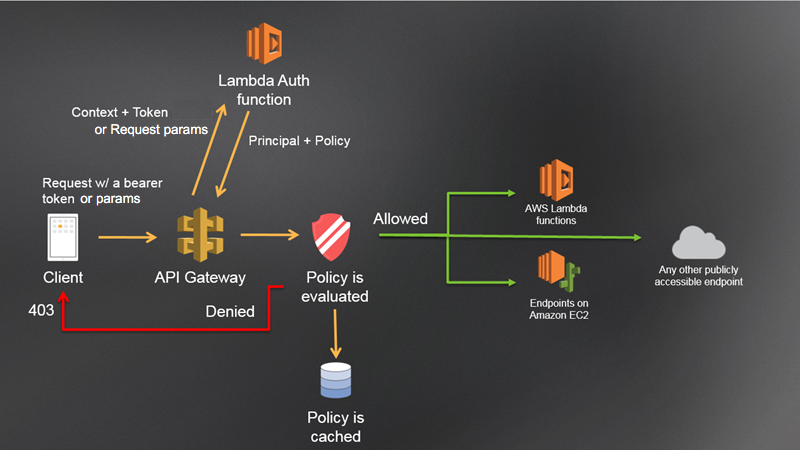
圖中描述的關鍵在於中間紅色的 Policy is evaluted 要呈現的,實作上來講,透過上面的 Lambda Auth Function 回傳 IAM Policy 的資料結構,此 Policy 描述能否完成授權。
所以實際流程大概是這樣:
- 客製驗證:整合自行設計的認證、授權,或者既有的系統
- 依據驗證的結果回傳對應的
IAM Policy,回傳內容是 JSON 內容的字串
途中 Lambda 也可以使用 Cognito 作認證。
Authorizer Types
使用 Lambda 作為 Authorizer 提供兩種授權類型:
TOKEN: 透過 HTTP HEADER 傳送 authorization token,通常配合 OAuth 使用REQUEST: 透過 request parameters 傳送授權資訊,像是用 headers, query strings, stage variables, or context parameters.
配置
- 建立 Custom Auth - Lambda Function
- 建立 IAM Role 作為 Custom Authorizer 的 Service Role
- 設定 Custom Authorizer
- 使用 Custom Authorizer
1. 建立 Custom Auth - Lambda Function
建立一個 Lambda Function,Code 如下。這段 code 是 官方文件 中簡化的版本,只有增加 customToken 作為驗證,通過驗證後,會回傳 IAM Policy 的 JSON 資料:
1 |
|
在 Lambda Console 可以用以下 JSON 測試:
1 | { |
測試結果如果正確,可以在 CloudWatch Logs 看到 DEBUG Log 顯示回傳內容是一段 IAM Policy:
1 | { |
這段 Code 的目的有兩個:
- 認證、授權:這段可以自行依照需求客製化,或者串接既有的服務
- 回傳授權的 IAM Policy
注意,這個 Lambda 使用的 IAM Role 不同於下一步的 Custom Authorizer Service Role
2. 建立 Custom Authorizer 的 Service Role
這個 IAM Role 是要給 API Gateway 使用的 Service Role,主要是 Runtime 時,要執行 Custom Authorizer 的身份。
建立 IAM Role 時,選擇以下的 Managed Policy:
AWSLambdaRole: 允許執行 LambdaAWSLambdaBasicExecutionRole: 主要是允許存取 CloudWatchLogs
注意:官方的 Managed Policy 命名不是很好,第一個一定要選到,否則無法執行
配置 Trust Relationship,主要是新增 apigateway.amazonaws.com 允許 API Gateway 執行此 policy
1 | { |
建立完成後,複製 ARN,下一個步驟使用。
3. 設定 Custom Authorizer
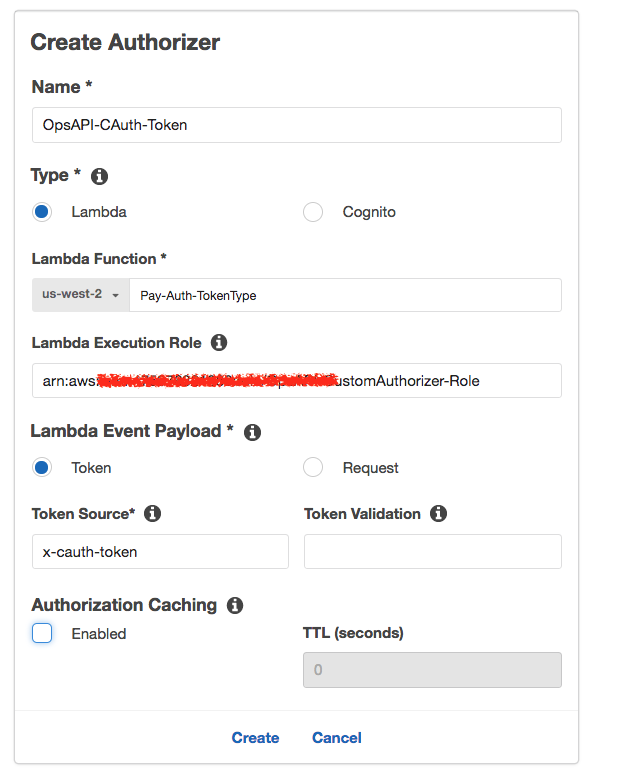
回到 API Gateway,到 API 的 Authorizer ,選擇 Create New Authorizer,填入相關資訊:
- Lambda Function Name: 這裡的名稱叫做
OpsAPI-CAuth-Token, 等一下設定會使用到。 - Lambda Execution Role: 填入上個步驟建立的 ARN
- Lambda Event Payload: 選 Token
- Token Source: 填入
x-cauth-token - Authorization Caching: 關掉,方便測試
設定如下圖:
4. 使用 Custom Authorizer
到 API 設定,選擇要使用的 Method,在 Method Request 裡的 Authorization,選擇剛剛建立的 Custom Authorizer,如下圖:
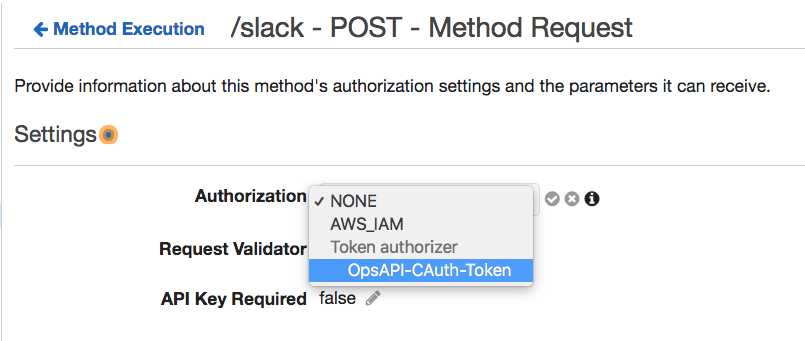
沒問題就部署 API.
5. 測試
用 cURL 送出 HTTP POST
1 | curl -X POST \ |
順利的話,會得到正確的結果。
注意事項 (Troubleshooting)
- Debug 不要開
Authorization Caching - Debug 如果更改 Custom Auth 設定,要重新部署 Rest API,像是開了 Auth Caching,關掉後,要記得重新部署。
- 注意 Custom Auth 的 IAM Policy,很容易選錯。
- 如果會間歇性的出現 200 / 402,然後收到這樣的 error message:
{ "Message": "User is not authorized to access this resource" },我的解法是,把 Custom Auth 的 TTL 調成 1s,然後重新部署就可以了。相關參考:Re: API gateway custom autorization
結論
本文整理如何在 API Gateway 使用 Lambda 做簡單的認證流程,屆下來繼續整理如何 Debug API Gateway。
延伸閱讀
系列文章
- Study Notes - Overview API Gateway
- Study Notes - Amazon API Gateway
- API Gateway - Custom Authorizers using Lambda
- API Gateway - Setup Logging
- API Gateway - Custom Domain Names
- API Gateway - Integrate with Internal Services
- Using API Gateway as DynamoDB Proxy
- API Gateway - Rate Limit and Throttling
- API Gateway Private Endpoint
- Design Async Invocation using API Gateway and SQS
- 2018/06/28: AWS Summit - 邁向 API 經濟 - API Gateway 導入之旅
參考資料
Comments
About
著作
演講
- 演講錄影 @ Youtube
- 探索職涯、複利人生 - AWS Career Exploration Day 2023
- 個人著作 SRE 書友見面會
- 軟體測試實務 - 新書發表會
- 探索職涯、成就未來 - AWS Career Exploration Day 2022
- 從理想、到現實的距離,開啟品味軟體測試之路
- 91APP 在 AWS 上的 SRE 實踐之路
- 在矩陣型組織裡,如何有效管理 AWS 的成本結構與系統架構
- 災難演練 @ AWS 實戰分享
- 導讀持續交付 2.0 - 談當代軟體交付之虛實融合
- 聊聊軟體交付的濫觴 談產出物管理
- 從緊急事件 談 SRE 應變能力的培養
- 邁向 API 經濟 - API Gateway 導入之旅
- Monitoring Tools 大亂鬥 - AWS CloudWatch
- Ops as Code using Serverless
- 淺談系統監控與 CloudWatch 的應用
AWS Certifications